Parent guide · Grade 2 Biblical Hebrew · Unit 5
Lesson 5.1 Writing Like a Scribe
Written for the parent. The Read aloud parts are written to your child; read them as they are. Do this parts are for you. Answers for you are marked Listen for.
At a glance
- Time
- 3 sessions of 15–20 minutes
- Goal
- Write Hebrew letters neatly from right to left. Know that the scribes copied the Bible letter by letter. Copy a short word with its vowels.
- You need
- Paper
- A ruler and a pencil
- A fine pen
- A sketchbook or plain paper, and crayons
- A King James Bible
- Worksheet A · the lesson page (it also has a short video (5:33))
Steps
Do this together: Write one sentence as neatly as you possibly can, slowly. How long did it take? Now imagine copying the whole Bible by hand. That is what scribes did, letter by letter, for thousands of years.
Read aloud: The story. God told the prophet Habakkuk: Write the vision, and make it plain upon tables, that he may run that readeth it. God wants His word written clearly so people can read it. More than a thousand years ago a scribe named Samuel ben Jacob copied the whole Hebrew Bible, added all the vowel points and notes, and signed his name in the middle of a beautiful decorated page.
Read aloud: How scribes wrote. Hebrew letters hang from an imaginary top line, not sit on a bottom line. Most letters are about the same size and shape as a square. Start every letter at its top right corner. Leave a little space between words. Write the letter first, then add its dot and vowel.
Read aloud: Practice. Draw a light top line. Write each letter of שָׁלוֹם hanging from it: shin, lamed, vav, end-mem. Then add the dot on the shin, the qamets under it, and the dot on the vav.
Do this: Say each word clearly; your child says it back twice. Point to a picture or the real thing when you can.
- כְּתוֹב (ketov) [keh-TOHV]: write!
- סֵפֶר (sefer) [SAY-fer]: book, scroll
- דָּבָר (davar) [dah-VAHR]: word
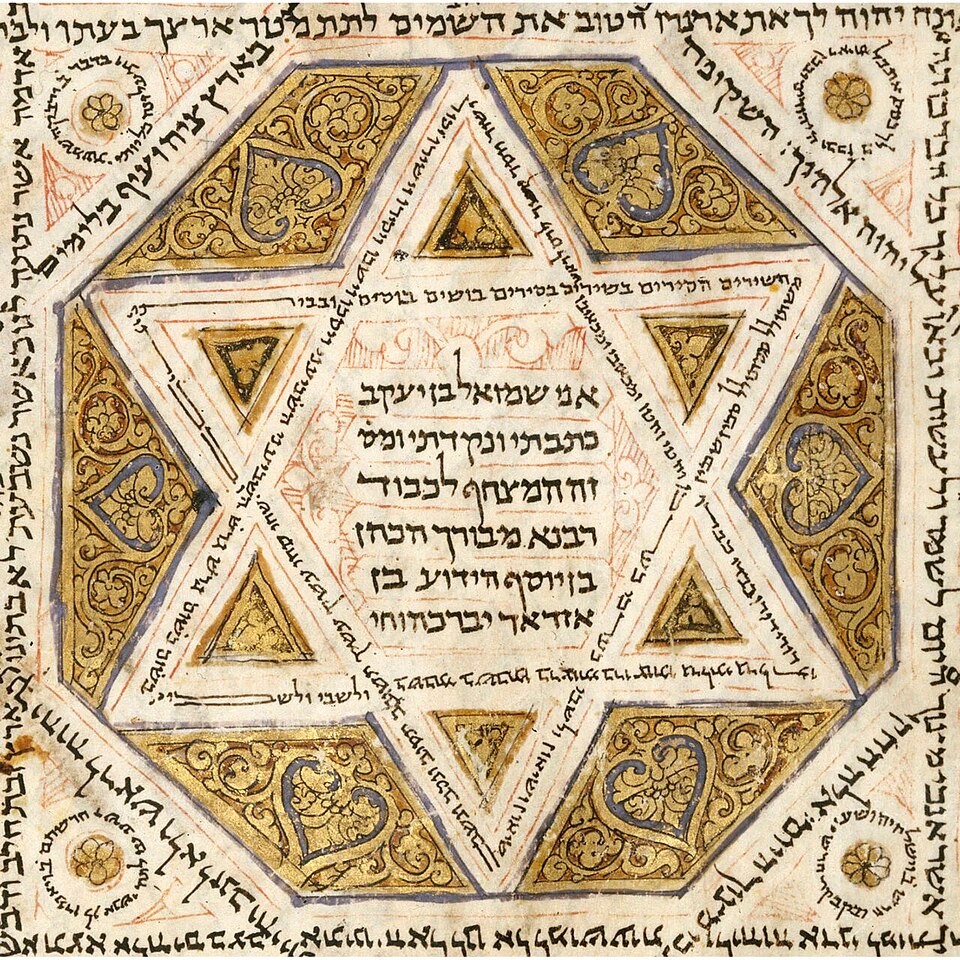
Carpet page of the Leningrad Codex, Samuel ben Jacob, scribe, 1008. Image: Wikimedia Commons, public domain Do this: Look at the picture together for a quiet minute before anyone talks.
Read aloud: The Leningrad Codex was written in Cairo in the year 1008. It is the oldest complete Hebrew Bible in the world, and the Hebrew in this course comes from it. On this page the scribe wrote, in the middle: “I, Samuel son of Jacob, wrote and pointed and gave the notes to this book.” The tiny writing around the design is made of notes about the text.
Point and find:
- Find the lines of writing in the very center.
- Find the gold.
- Find the tiny words running around the borders.
- Do the lines go right to left or left to right?
Ask:
- “Why would a scribe sign his work?”
- “How many hours do you think this one page took?”
Show: Where do you start writing a Hebrew letter?
Say this: “Hebrew goes right to left.”
Say this: “Letters hang from the top line.”
Answer: At its top right.
Show: Do you write the vowels first or last?
Say this: “Scribes wrote the letters, and the vowels were added later.”
Answer: Last, after the letters.
Do this: Ask out loud. Let your child try first; help only after a real try.
Ask: In which direction do you write Hebrew?
Listen for: Right to left.
Ask: Do Hebrew letters hang from a top line or sit on a bottom line?
Listen for: They hang from a top line.
Ask: Who copied the Bible by hand?
Listen for: Scribes.
3 more on the lesson page.
Read aloud: Make your own lined scribe’s page and copy three words.
Steps:
- With the ruler, draw light lines across the page about one finger apart.
- Write שָׁלוֹם, מֶלֶךְ and יָד hanging from the lines, right to left.
- Add the vowels last.
- Sign the bottom: “Written by (your name).”
Tips for you:
- Start each letter at its top right.
Done when your child can say:
- My letters hang from the lines.
- My vowels are under the right letters.
Do this: Your child picks one or more; you write the date.
- Copy the whole alef-bet once more in your neatest scribe’s writing.
Read aloud: Scribes counted the letters of each book to check their copies. They even knew which letter was the middle letter of the Torah.
- Writing letters sitting on the bottom line. Hang them from the top.
- Writing the word from left to right. Start at the right.
Copy one word as neatly as you can. The parent checks it like a master scribe: every letter, every dot, every vowel. If it is perfect, you earn a gold star on your scribe’s page.
Say this: “Tell me what you learned today.”
Listen for: Write Hebrew letters neatly from right to left.; Know that the scribes copied the Bible letter by letter.; Copy a short word with its vowels.
And the LORD answered me, and said, Write the vision, and make it plain upon tables, that he may run that readeth it.
In Hebrew, from the Leningrad Codex: <span class="heb-block" lang="he" dir="rtl">כְּתוֹב חָזוֹן וּבָאֵר עַל־הַלֻּחוֹת</span> God tells Habakkuk to write clearly. The first word here, ketov, means write!
Spread over the week
3 sessions of 15–20 minutes. Stop while it is still going well.
- Session 1. Warm-up, then read and teach the new idea and the new words. Picture study and show how.
- Session 2. Practice together, then start the project. Finish the project, then the sketchbook.
- Session 3. Narration, the game and the Scripture.